NewClaim a free social report


tiktok analytics
Similar Accounts:
tiktok analytics
Similar Accounts:
followers
58.7K
impressions
7.33M
likes
71.9K
comments
635
posts
91
engagement
0.990%
emv
$165K
Average per post
80.5K
Key Metrics
Impressions
monthly
Distributions
Content

2.89M
39.0K
189
6mo ago
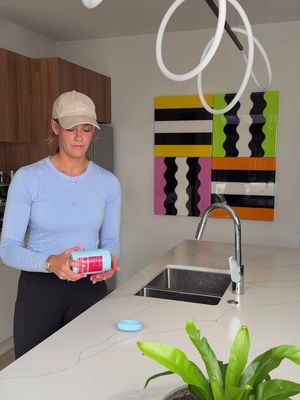
simone_anderson
Because wrapping the food stops the air from circulating, so instead of getting crispy and golden, everything just kind of steams 😅 Line the basket, let the air flow, and suddenly the air fryer actually does what it’s meant to do. #airfryertips #KitchenHacks #homecooking #mumlife #learnsomethingnew

771K
5.50K
47
4mo ago
simone_anderson
Unbothered 💅🏼 #carhack #homehack #magtouchup

770K
523
7
7mo ago
simone_anderson
Still lying to your dentist about flossing? 😅 Same… until now. The new @Colgate Australia pink Blast makes flossing quick, simple and actually satisfying - plus it looks cute sitting on the bathroom bench 💗 Available at Chemist Warehouse on promo right now for $89.99 🙌 Your teeth, gums and dentist will thank you 🦷✨ ad
611K
611
14
6mo ago
simone_anderson
I’ve admitted this many times… I’ve been a lolly fiend since way back 😅 These days I just enjoy them with a bit more moderation and that’s exactly why I’ve been loving the Hormone Gummies from @Moodi They honestly taste like little peach sweets, genuinely delish and because they feel like a treat, they’re so easy to remember as part of my morning routine. Since taking them, I’ve noticed I feel more in control of cravings, my energy feels steadier, and I just feel more in sync with my body overall. They’re made with science-backed ingredients to support hormones, metabolism and cravings - without feeling like another hard-to-swallow supplement. ✨ What’s inside: • Myo-inositol - supports healthy hormone balance & menstrual cycle regularity • MecobalActive Vitamin B12 - supports energy metabolism & helps reduce tiredness • Chromax Chromium - supports healthy carb metabolism, cravings & appetite • Dietary fibre - helps support feelings of fullness • Peach juice - for that juicy, sweet flavour 🍑 Basically… it’s like a little treat that loves you back 💛 AD

441K
431
22
5mo ago
simone_anderson
Trying the viral Japanese cheesecake hack… and honestly? YES. Here’s the easiest version:
Take a pot of Greek yogurt, slot in Biscoff biscuits, and pop it in the fridge overnight.
That’s it. That’s the whole hack. And the best part?
There are SO many variations you can do - your imagination can go wild.
I tried adding Arnott’s Scotch Fingers to strawberry Greek yogurt and topping it with fresh strawberries.
And it was actually unreal. Now, I’m an absolute cheesecake FIEND.
Like obsessed is an understatement.
So anyone out there claiming this is “real cheesecake”… can get fucked. 😂
But it’s a great alternative, because it’s bloody delicious, a much lower cal alternative, and so easy to make. In fact… we’ve just polished these off and I’ve already made more.
So yeah.
My rating? 10/10. Would you try it? 🤍🍓🧁 #JapaneseCheesecake #CheesecakeTok #ViralDessert #EasyDessert #DessertTok
420K
853
16
8mo ago
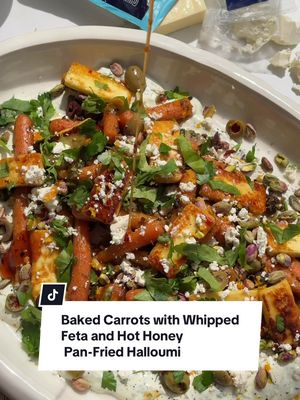
simone_anderson
As a kid, I used to hide my carrots in the gutter (true story 😅). Fast forward a few years, and now they’re one of my favorite things on the plate. These roasted carrots with @mainland Creamy Feta, @mainlandnz Haloumi, and hot honey are next-level - creamy, sweet, savory, and so good you’ll forget it’s a veggie dish. 🥕🔥 Baked Carrots with @Mainland Creamy Feta and Hot Honey Pan-Fried @Mainland Haloumi Ingredients: For the Baked Carrots: 200g Mainland Creamy Feta, crumbled 650g baby carrots (with tops on) 3 tbsp pesto 2 tbsp honey Salt & pepper to taste For the Whipped Feta Cream: 250g Mainland Creamy Feta 3/4 cup Greek yogurt 1 garlic clove, minced 2 tablespoons fresh mint 2 tablespoons olive oil 2 tablespoons fresh parsley 2 tsp honey Salt & pepper to taste For the Hot Honey Pan-Fried Haloumi: 200g Mainland Haloumi, sliced 1 tbsp olive oil 2 tbsp hot honey (store-bought or homemade by mixing honey with chili flakes) Extras: 100g olives, chopped 70g pistachios, chopped 1/2 bunch parsley, roughly chopped 1/2 lemon, finely grated zest Instructions: 1. Prepare the Baked Carrots: Preheat the oven to 200°C (fan). Wash carrots thoroughly without peeling. Place the carrots in an ovenproof dish. Drizzle with pesto, honey, and season with salt and pepper. Toss everything together to coat the carrots well. Roast the carrots for 30 minutes, turning them halfway through, until tender and caramelised. 2. Make the Creamy Feta whip: In a food processor, blend the Mainland Creamy Feta and other ingredients until smooth and creamy. Set aside for plating. 3. Pan-Fry the Haloumi: Heat olive oil in a pan over medium heat. Fry the Mainland Haloumi slices for 2-3 minutes on each side until golden brown and crispy. Drizzle the hot honey over the haloumi slices just before removing from the pan. Let it sizzle for a moment for an extra kick. 4. Assemble the Dish: Spread the creamy feta whip on a large serving platter. Arrange the baked carrots on top of the whipped feta, spooning any remaining pesto from the baking dish over the carrots. Top with hot honey pan-fried haloumi slices, chopped olives, crumbled feta, parsley, pistachios, and a sprinkle of lemon zest. 5. Serve & Enjoy! Serve immediately while the haloumi is still warm. This dish is a delightful mix of textures and flavours - perfect for impressing guests or treating yourself! #EasyRecipe #healthyrecipes #quickrecipes #festivedinner #carrots
173K
6.26K
4
3mo ago
simone_anderson
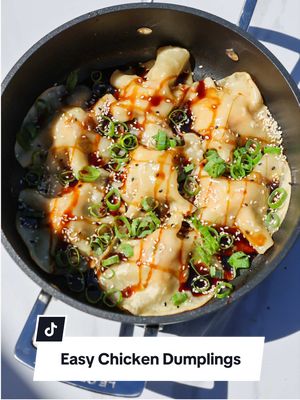
I’ve been obsessed with Asian-inspired recipes lately, so here’s another one you need to save 🤤
The easiest chicken dumplings ever - no stress, no complicated folding, just a quick, flavour-packed perfect girl dinnermoment ✨ Easy Chicken Dumplings Ingredients: * 500g chicken mince * Packet gyoza wrappers * 1 carrot, grated * ½ spring onion, finely chopped * 2 tsp sesame oil * 2 tbsp soy sauce * 3 cloves garlic, minced * 2 tsp grated ginger Toppings: * Chilli oil * Spring onion, sliced * Sesame seeds * Extra soy sauce or ABC sauce Method: 1. In a bowl, mix together the chicken mince, grated carrot, spring onion, sesame oil, soy sauce, garlic, and ginger until well combined. 2. Roll a golf size amount into a ball and place into a hot pan, and cover with a dumpling wrapper. 3. Add a splash of water to the pan, cover with a lid, and steam for 5 minutes until cooked through. 4. Remove the lid and let them crisp up again for that perfect golden base for a minute or so. Serve hot with crispy chilli oil, extra soy sauce or ABC sauce, and a sprinkle of sesame seeds and spring onion on top. Juicy, crispy, and packed with flavour… these are on repeat in our house 🔥 #dumplings #easydinner #girldinner #asianinspired #quickmeals

173K
77
1
3mo ago
simone_anderson
Easter at ours is less about the egg hunt… and more about the hot cross buns and butter 🧈💛 A cosy table, the boys buzzing, warm buns straight from the oven, and @mainlandnz ButterSoft at the centre of it all. That first spread on a hot bun - smooth, melty, and generous, just sets the tone for the whole morning. It’s the little traditions for me. Setting the table, sharing food, and everyone gathering together before the chocolate chaos begins. And if you ask our family… it’s never a race to the bun, it’s always a race to the butter
138K
4.48K
5
5mo ago
simone_anderson
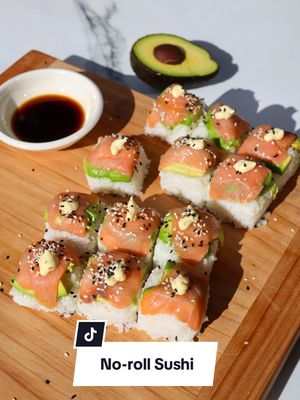
Love sushi but hate the faff of rolling it? This no-roll version gives you all the flavour with none of the effort. Ingredients: * Smoked salmon * 1 avocado, sliced * Cooked sushi rice * Nori sheets * Japanese mayo * Sesame seeds * Soy sauce, for dipping * Cling wrap * Ice cube tray Method: 1. Line an ice cube tray with cling wrap, leaving enough overhang to lift everything out later. 2. Add smoked salmon into each section, followed by avocado and sushi rice. Press down firmly so each piece is compact. 3. Place a small piece of nori on top of each section. 4. Cover and pop into the fridge for 20 minutes to set. 5. Flip out using the cling wrap and remove from the tray. 6. Drizzle with Japanese mayo, sprinkle over sesame seeds, and serve with soy sauce for dipping. The easiest sushi you’ll ever make - no rolling, no stress, just delicious little bites. #EasyRecipes #sushilovers #quickmeals #homecooking #viralrecipes

117K
2.88K
15
2mo ago
simone_anderson
#HomeOrganisation #OrganisedHome #OrganisationHacks #DrawerOrganisation #SatisfyingOrganisation

104K
1.29K
41
8mo ago
simone_anderson
#MummyMakeoverTurkey #BodyContouringTurkey #TurkishAesthetics #SkinRemovalSurgery #CosmeticSurgeryTurkey

90.4K
1.07K
22
9mo ago
simone_anderson
46 calorie Strawberry & Vanilla Pudding Ingredients: * 1 packet Aeroplane sugar-free jelly (your choice of flavour, but strawberry would be ideal) * 2 cups sugar-free “Simply Dessert” white chocolate pudding * fresh strawberries (sliced) Method: * Prepare your sugar-free jelly as per the instructions on the package into four containers & refrigerate until set. * Gently spoon the sugar-free white chocolate pudding on top of the jelly layer. Smooth it out into an even layer using the back of a spoon or a spatula. The pudding should be creamy & fluffy. * Add a layer of sliced fresh strawberries over the pudding, refrigerate for an hour if desired. #lowcalorierecipes #lowcaloriedessert #weightlossrecipeideas #snackidea
87.9K
1.05K
12
6mo ago
simone_anderson
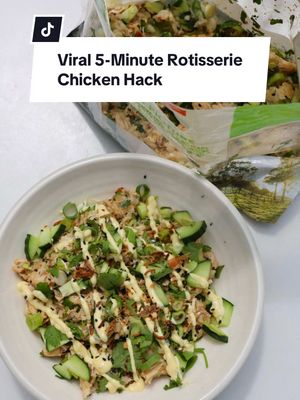
Viral 5-Minute Rotisserie Chicken Hack 🍗🔥
High protein, zero effort, BIG flavour. If you need dinner on the table fast, this one is it. Literally took 5 minutes and tastes so good - the ultimate quick, high-protein meal. Ingredients * 1 hot roast chicken, bones removed and shredded * Rice of choice (I used sushi rice) * 1 bunch Spring onion, finely chopped * 1 bunch Coriander, finely chopped * 3 tablespoons Soy sauce Extras I added because *yum* & we had in the house already * Sriracha * ABC sauce * Drizzle of sesame oil * Sesame seeds * Cucumber, sliced for extra crunch * Crispy shallots Method 1. Full all meat off the chicken and ensure you keep all the juices in the bag. 2. Into the bag add rice, chicken, spring onion, coriander, soy sauce, sriracha, ABC sauce, crispy shallots and a drizzle of sesame oil. 3. Toss until combined. 4. Serve straight out of the bag or into a bowl if you must! ;) Fast, flavour-packed and protein-loaded - perfect for busy nights when you still want something delicious. 🤌✨ #EasyRecipes #quickdinner #highproteinmeals #viraleats #weeknightdinner

55.9K
585
25
8mo ago
simone_anderson
#MummyMakeoverTurkey. #BodyContouringTurkey #TurkishAesthetics #SkinRemovalSurgery #CosmeticSurgeryTurkey

38.9K
492
9
6mo ago
simone_anderson
Sticky Smashed Pork Tacos 🌮
Low-effort, big-flavour weeknight dinner that comes together fast and hits every craving - sticky, crispy, fresh, and a little spicy. Serves 4 🛒 Ingredients Seasoned Pork Mince * 680g pork mince * 1 tbsp fresh ginger, finely grated * 1 tbsp fresh garlic, minced * 1 tbsp soy sauce * 1 tbsp honey * 1 tsp cayenne pepper * 1 tsp garlic powder * 1 tsp plain flour Sticky Glaze * 3 tbsp soy sauce * 3 tbsp honey * 1 tbsp sesame oil * 1 tbsp hoisin sauce * 1 tbsp sesame seeds * Juice of ½ lime * 1 tsp sriracha * 1 tsp fresh ginger, grated Smashed Tacos * 8 tortillas * 2 tbsp olive oil To Finish * Fresh coriander, chopped * Pickled red onions * Spring onions, sliced 👩🍳 Method 1. Season the Pork Add all pork mince ingredients to a bowl and mix well until fully combined. Set aside. 2. Make the Sticky Glaze Add all glaze ingredients to a small saucepan. Bring to the boil, then reduce heat and simmer for 3–4 minutes until slightly thickened. Remove from heat. 3. Smash the Tacos Divide the pork mixture into 8 equal balls. Place one ball onto each tortilla and press it out evenly over the surface. 4. Cook Heat olive oil in a large frying pan over medium-high heat.
Place tortillas pork-side down and cook for 2 minutes until golden and crispy.
Flip and cook for 1 minute until the tortilla edges are crisp. Brush the pork with the sticky glaze, flip again, and cook for another 30 seconds. Flip once more if needed to crisp the tortilla. Repeat with remaining tacos. 5. Serve Brush with any remaining glaze and finish with fresh coriander, spring onions, and pickled onions. Serve hot and enjoy immediately. ✨ Tip: These are unreal straight from the pan - crispy edges, sticky pork, and fresh toppings make them perfect for sharing (or not). #food #Foodie #instafood #foodporn #DinnerIdeas

38.8K
334
9
12mo ago
simone_anderson
I usually outsource birthday cakes to Mum (because let’s be real, baking is not my strong suit 😅), but this year Costco came through with the goods 🙌🏼 If you’re not a confident baker or you’re just time-poor but still want to do something thoughtful and homemade-ish for your little one’s birthday — this is your sign. Grab a plain cake, pile on all their favourite things, and call it a day 🎉 Dino toppers? Check. Sprinkles? Of course. Chocolate? Always. Made with love… and zero stress 💚🦖 #BirthdayHack #MumWin #DinoParty #EasyBirthdayCake #CostcoToTheRescue #B#BirthdayCakeHackM#MumHackM#MumLifeUnfilteredR#RealMumLifeP#PinterestFailApprovedH#HomemadeWithHelpB#BirthdayWinP#PartyLikeAMotherC#CostcoCakeGlowUpE#EasyPartyIdeasT#ToddlerBirthdayD#DinoBirthdayPartyD#DinoCakeB#BakingForNonBakersC#CakeDecoratingFailOrWinM#MumDoingHerBestP#PerfectlyImperfectM#MadeWithLoveNotSkillL#LazyGirlBirthdayHackK#KmartMumVibes

32.8K
440
12
8mo ago
simone_anderson
#MummyMakeoverTurkey #BodyContouringTurkey #TurkishAesthetics #SkinRemovalSurgery #CosmeticSurgeryTurkey

27.6K
255
8
11mo ago
simone_anderson
The perfect laundry detergent dispensers 🙌🏼🧼 Lightweight, easy to hold, and super compact so they don’t take up heaps of space. They’re well-sealed with an easy pour spout, and the lid doubles as a measuring cup (genius). Plus… how sleek do they look on display?! Best part? They’re from Temu so they’re super cost-effective too 🙌🏼 Here’s the link if you want to grab some 👉🏼 https://share.temu.com/BS2j2eSBjeA #L#LaundryRestock #L#LaundryHack #H#HomeOrganisation #T#TemuFinds #L#LaundryGoals #L#LaundryRoomAesthetic #C#CleaningTok #O#OrganisationAddict #S#SmallSpaceSolutions #L#LaundryDispenser #B#BudgetFinds #M#MumTok #H#HomeHacks #L#LaundryEssentials #satisfyingsetups
15.4K
214
0
5mo ago
simone_anderson
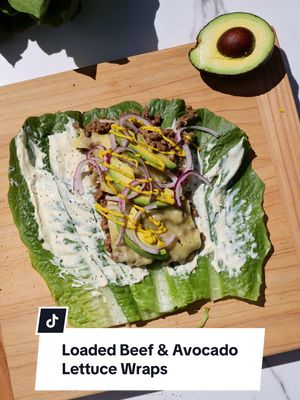
Loaded Beef & Avocado Lettuce Wraps You need a quick, low-carb meal that’s fresh, filling and packed with flavour. These loaded lettuce cups hit every time. Ingredients: * Lettuce leaves * Avocado, sliced * Light cream cheese * Red onion, sliced * Mustard * Sliced cheese * Ground beef sautéed with onions and taco seasoning Method: 1. Cook the ground beef with onions and taco seasoning until browned and fragrant. 2. Lay out lettuce leaves as your base. 3. Spread a little light cream cheese and mustard onto each leaf. 4. Add the cooked beef mixture, sliced avocado and sliced cheese. 5. Roll and enjoy immediately. Fresh, juicy, and seriously satisfying - perfect for an easy lunch or quick dinner. 🥬🥑 #highproteinmeals #lowcarbrecipes #easymealideas #weightlossfriendly #quicklunchideas

15.2K
225
2
9mo ago
simone_anderson
High-Protein Sweet Corn Chicken Bowls
55g protein per bowl | Makes 3 bowls
Fresh, flavour-packed, and ideal for meal prep. 🍗 For the Chicken: * 700g chicken breast, cubed * Salt & pepper, to taste * 1 tsp garlic powder * 1 tsp chilli powder * 1 tsp smoked paprika * ¼ tsp ground cumin * 1 tbsp olive oil (for marinating) * Avocado or canola oil spray (for cooking) Toss chicken with spices and oil, marinate for at least 30 mins, then cook in a hot non-stick pan until golden and cooked through (approx. 6–8 mins). — 🌽 Corn Salsa: * 2 cups corn (fresh, frozen, or canned – drained if using canned) * ¼ cup Best Foods Light Mayo * 1 capsicum, diced * ¼ cup crumbled feta * Juice & zest of 1 lime * 1 small jalapeño or green chilli, finely diced (optional) * 2–3 tbsp fresh coriander, chopped * 1 avocado, cubed * 1 tsp Tajin or chilli-lime seasoning (optional) Mix everything except avocado, then gently fold it in last. 🍚 To Assemble: * 3 cups cooked rice * Optional: extra coriander, lime wedges, hot sauce, or a drizzle of Greek yoghurt with chipotle pepper blended in. Layer rice, chicken, and a big scoop of corn salsa. Garnish and enjoy! #highproteinmeals #mealpreprecipes #easyhealthyrecipes #proteinpacked #fitfoodie
Simone Anderson (@simone_anderson) Tiktok Stats & Analytics
Simone Anderson (@simone_anderson) has 58.7K Tiktok followers with a 0.99% engagement rate over the past 12 months. Across 91.0 videos, Simone Anderson received 71.9K total likes and 7.33M views, averaging 790 likes per video. This page tracks Simone Anderson's performance metrics, top content, and engagement trends — updated daily.
Simone Anderson (@simone_anderson) Tiktok Analytics FAQ
How many TikTok followers does Simone Anderson have?+
Simone Anderson (@simone_anderson) has 58.7K TikTok followers as of July 2026.
What is Simone Anderson's TikTok engagement rate?+
Simone Anderson's TikTok engagement rate is 0.99% over the last 12 months, based on 91.0 videos.
How many likes does Simone Anderson get on TikTok?+
Simone Anderson received 71.9K total likes across 91.0 videos in the last 12 months, averaging 790 likes per video.
How many TikTok views does Simone Anderson get?+
Simone Anderson's TikTok content generated 7.33M total views over the last 12 months.